Through this article, you will get to know about the easiest way to bypass Google account with a trusted and reliable tool.
Security features are introduced in the devices to ensure the full protection of the user’s data and privacy. Google FRP lock is one of its kind that is used in Android devices to provide security to the device’s information and encrypted data. As factory reset can erase all of your data and the phone gets restored to its default settings, FRP lock protects your device from unverified factory reset.
However, if you have accidentally enabled the FRP lock on your phone and you can’t access your Google account, this article will offer simple steps to bypass Google account through a powerful tool.
Part 1: Introducing Dr.Fone – Screen Unlock (Android)
Do you want an authentic Android lock screen removal tool? Try Dr.Fone as a special FRP bypass tool for users that can easily tackle every sort of lock such as passcodes, PIN, lock pattern, fingerprint along with FRP lock.
Just with a few swipes, you can bypass Google account and can fully access your Android device again. By unlocking the FRP lock from your Android device, you can also remove the device from your Google account to disable the FRP lock. Thus, Dr.Fone – Screen Unlock (Android) will enable you to bypass Google account effortlessly so that you can use your Android device again without any limitations.
Part 2: A Detailed Step-by-Step Guide on How to Bypass Google Account with Dr.Fone
To effectively bypass Google account verification using Dr.Fone, read the following steps.
Step 1: Select Screen Unlock
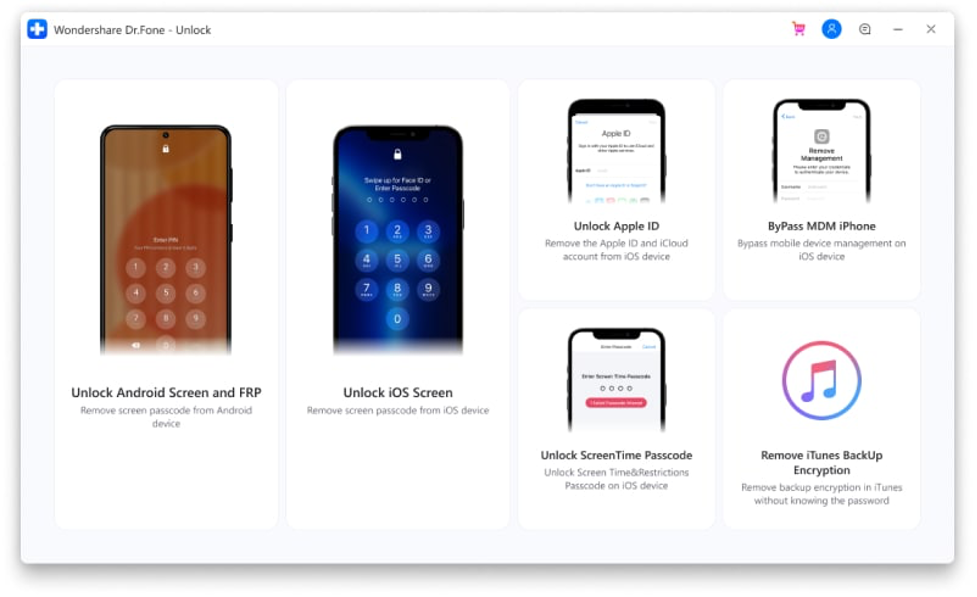
Launch the Dr.Fone tool on your computer and open its user interface. From its main interface, click on the “Screen Unlock” feature. Meanwhile, make your phone connected with a strong internet connection. Now, from the displayed window, tap on “Unlock Android Screen/FRP” to proceed.
Step 2: Click to Bypass Google Account
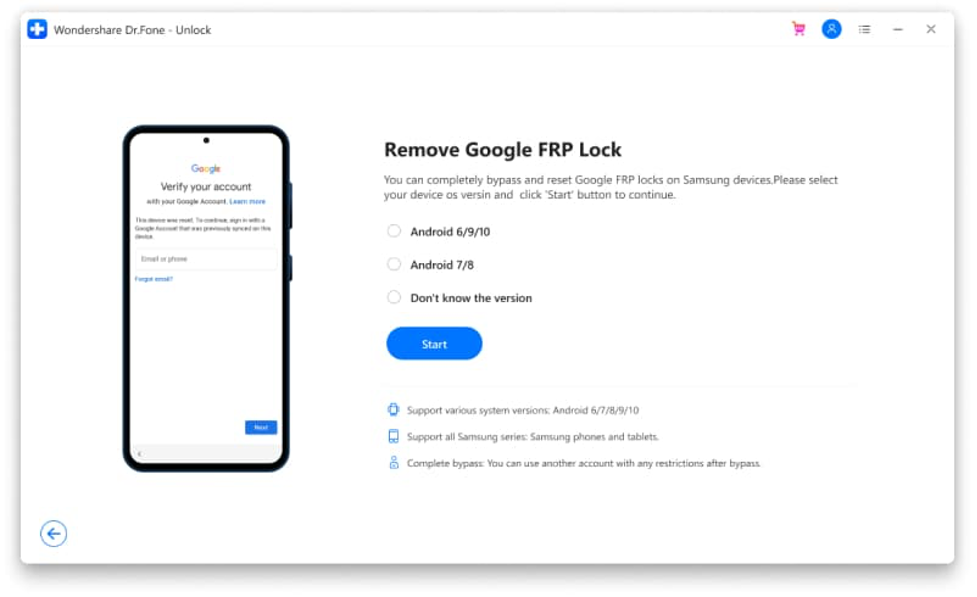
To continue, choose “Remove Google FRP Lock” to initiate the process of bypassing the Google account. On the displayed screen, click on the OS version of Android to continue as Android 6/9/10, and Android 7/8 have different ways to unlock.
Step 3: Connect Android Device
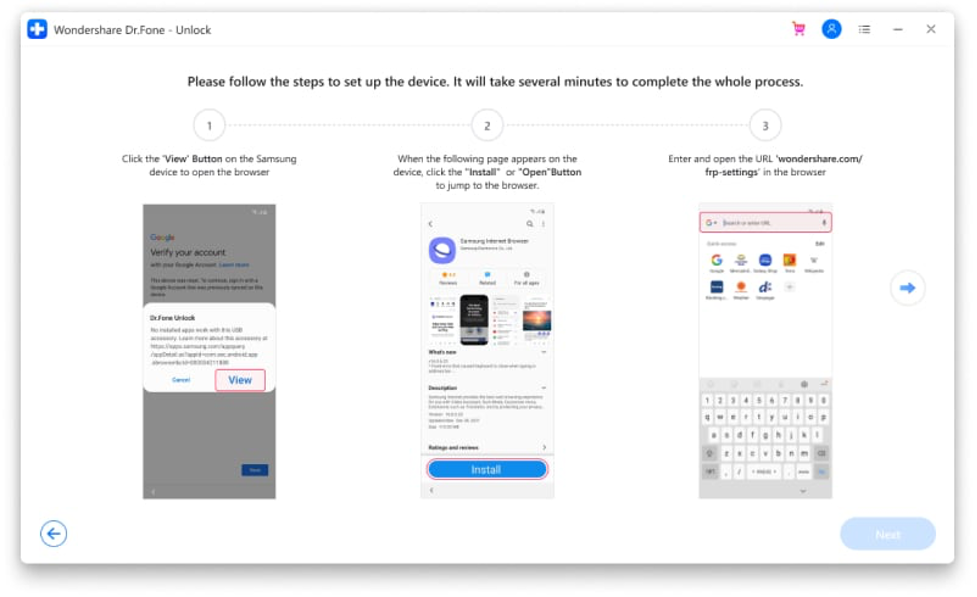
Now use a USB cable to build a connection of your Android device to the computer. Give confirmation about your device’s information on a pop-up notification message. Your Android device will get a notification from where you tap on “View” that will navigate you to the Play Store. Now, install this particular browser on your phone, or if it is already installed, tap on “Open” to proceed. Enter the URL “drfonetoolkit.com” on the browser to continue.
For Android 6/9/10
Step 1: Open Settings
From the newly displayed page on the browser, tap on the option “Android 6/9/10”. Now, select “Open Settings” from the new window and then tap on “PIN” to continue.
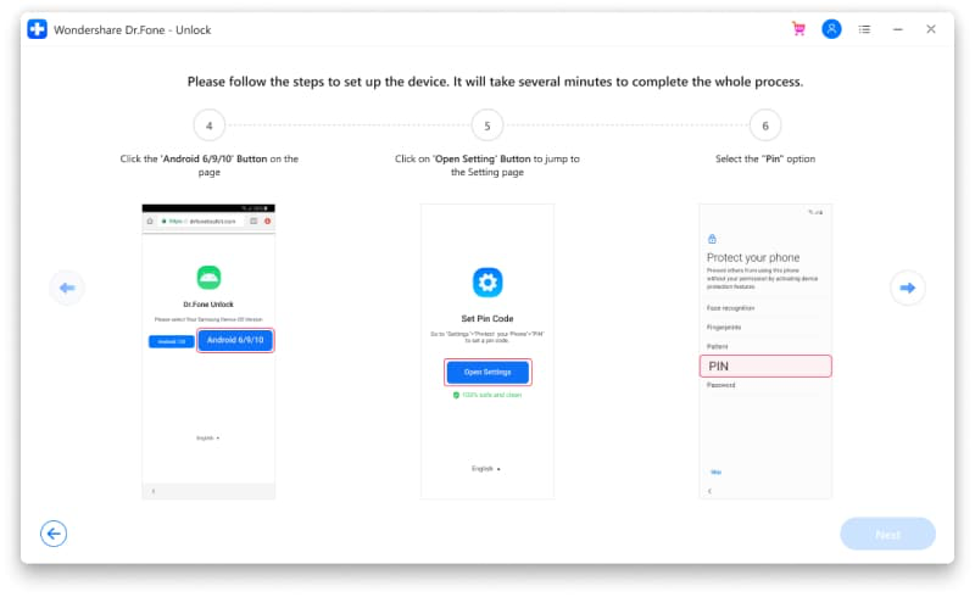
Step 2: Enter PIN
You will be redirected to the next page, where you tap on the “Do not require” button and make your PIN code by entering it into the given box. On the next window, tap on “Skip” to proceed further.
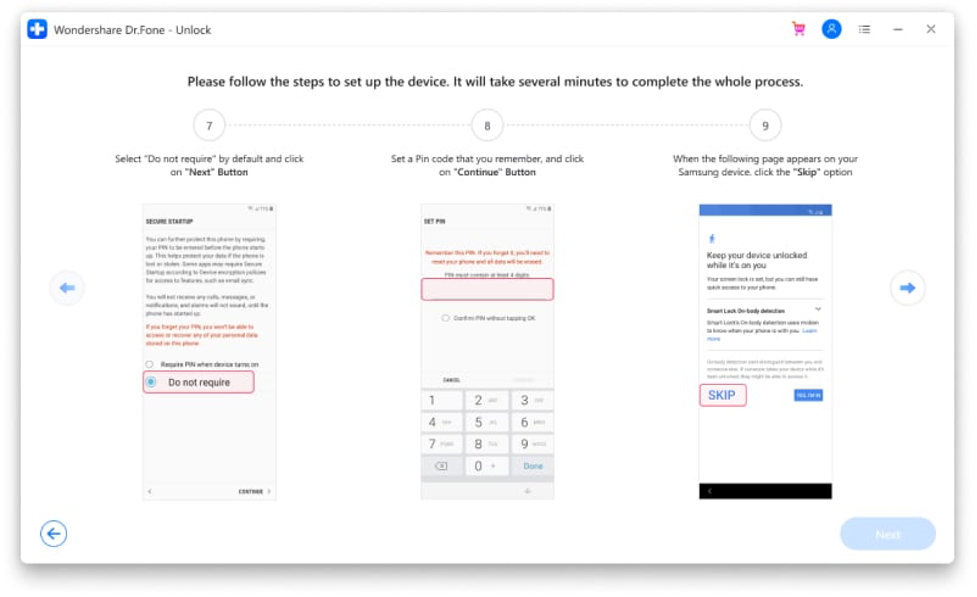
Step 3: Sign-in to Google Account
Now navigate to the previous Wi-Fi connect page by tapping on the “Back” button. Now click on the “Next” option to proceed with the process and enter the PIN code you recently set up. Select “Continue,” and you will be headed to the Google account sign-in page. On this page, click on “Skip,” and your FRP lock will be unlocked easily.
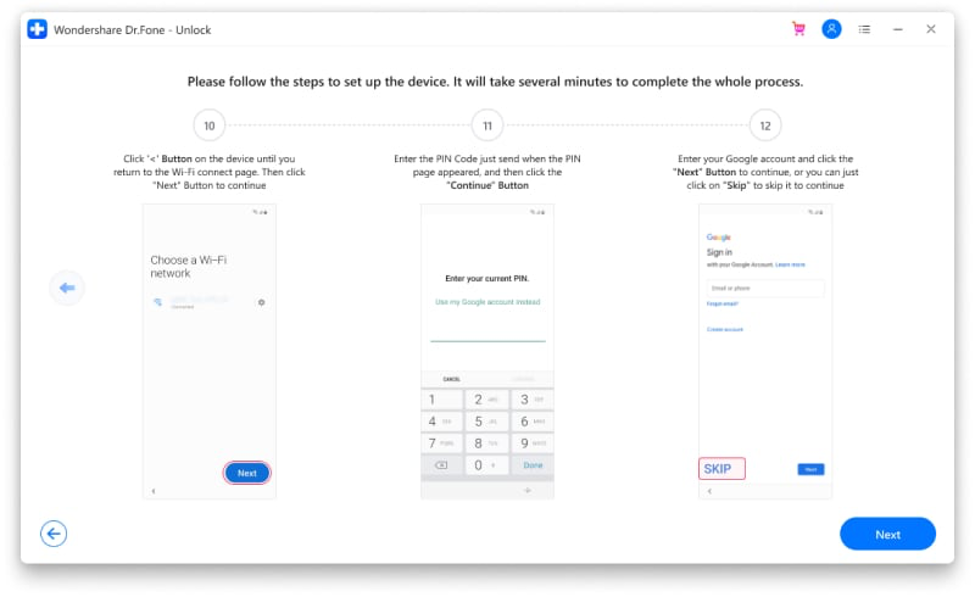
For Android 7/8
Step 1: Open Browser
On the new browser page, after entering the URL “drfonetoolkit” on your Android device, tap on the option “Android 7/8”. Afterward, select the “Download APK” option to install the apk file. Once the file gets installed, tap on “Open” to continue.
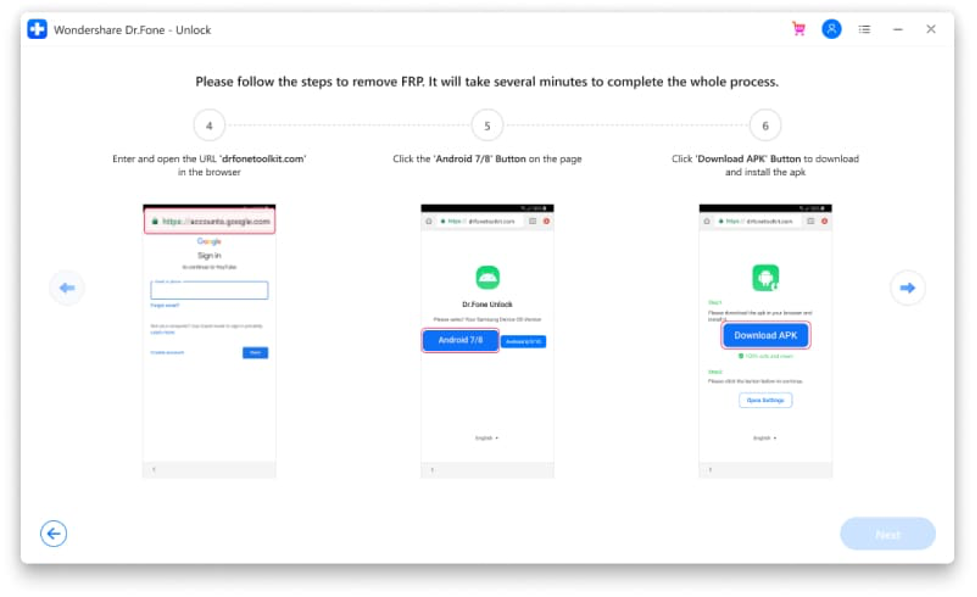
Step 2: Install .apk File
If a security message pop-ups, reach the “Settings” of your phone and enable the option called “Allow from this source.” Now go back to the installation and wait for the process to complete. Once finished, tap on “Done.”
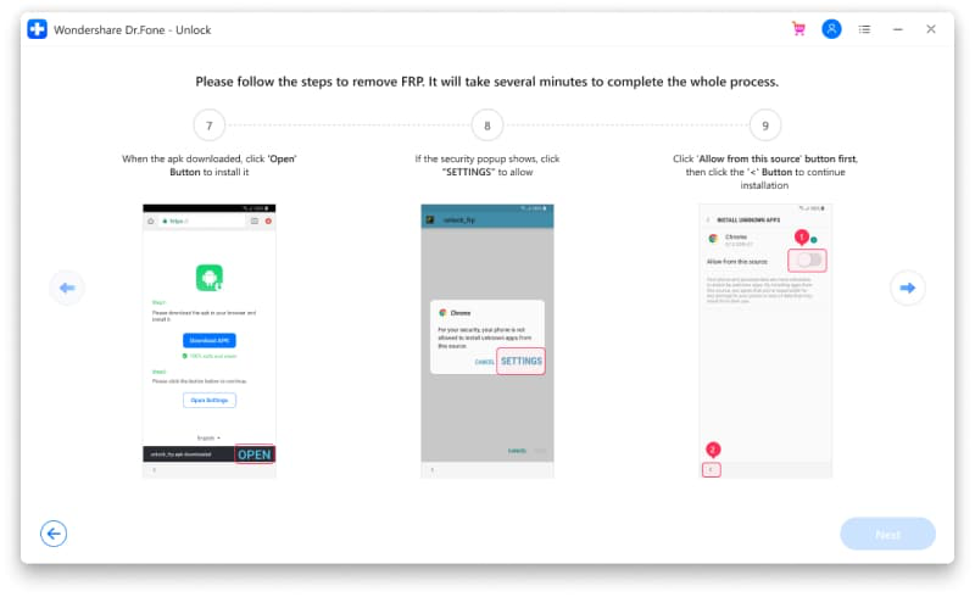
Step 3: Go to Settings
Now go back to the .apk download screen and tap on the option “Open Settings.” You will be headed to your device’s settings from where you click on the option of “Lock screen and Security.” On the next window, click on “Other Security Settings” to proceed.
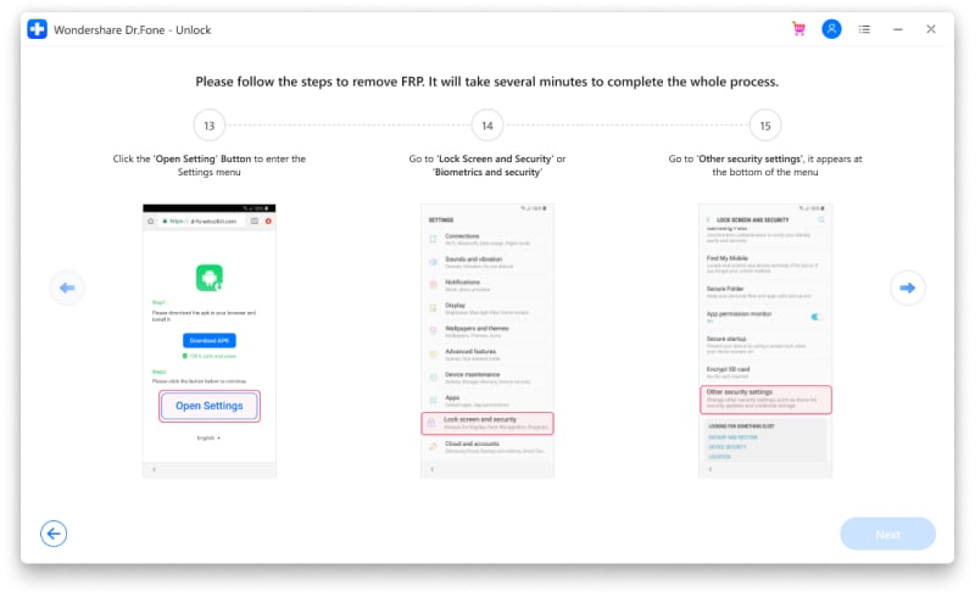
Step 4: Disable Services
By clicking on the option “Device Administrators,” disable the features of “Find My Device” and “Android Device Manager.” Once done, tap on the “Deactivate” option.
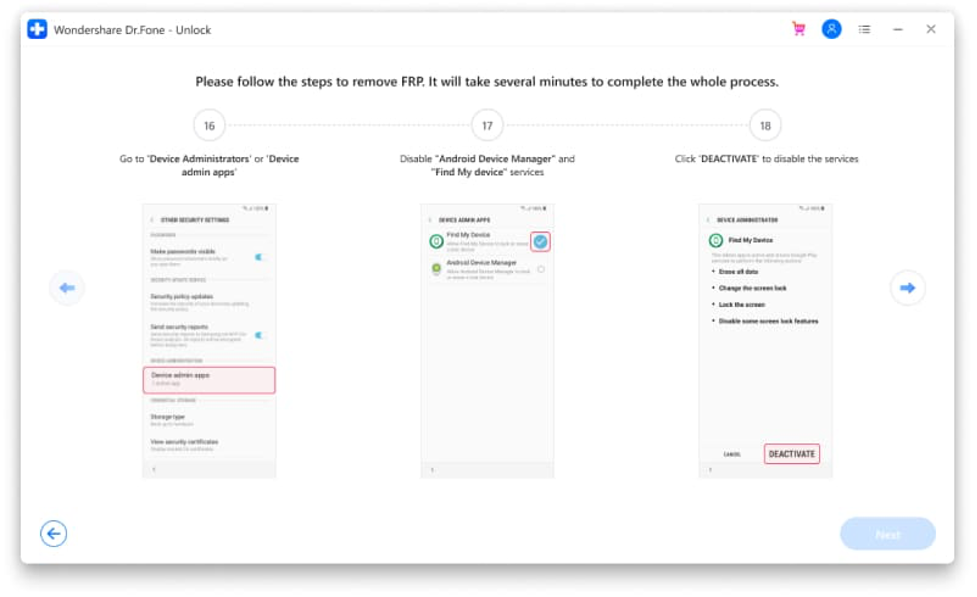
Step 5: Disable Google Play Store
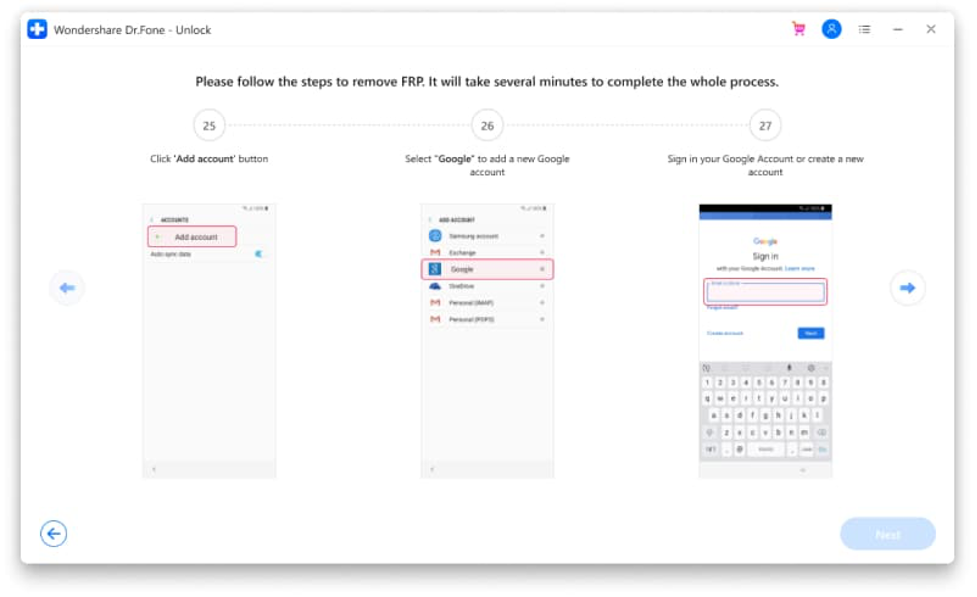
Turn back to the device’s settings and click on the option “Apps.” Now disable the options called “Google Play Stores” and “Google Play Services.” Afterward, revert back to the settings and click on “Clouds and Accounts.” On the new window, tap on “Add Account” and choose Google to log in with your Google account.
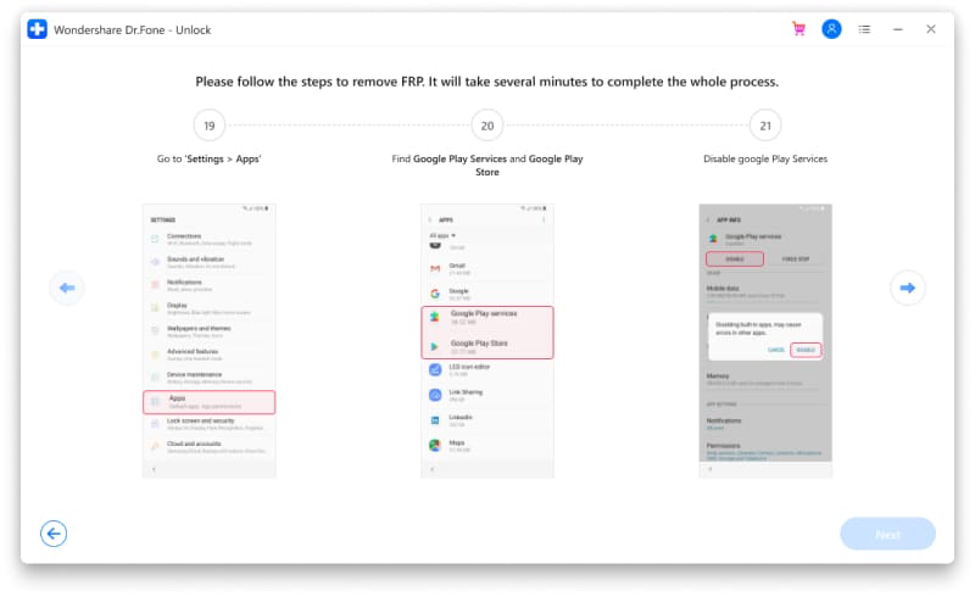
Step 6: Enable Services
Once you have logged in, tap on “I agree” to add the Google account. Go back to the settings and tap on “Lock Screen and Security,” and then click on the “Other Security Settings” options. Select “Device Administrators” and enable the services of “Find My Device” and Android Device Manager.”
Step 7: Restart Phone
Now restart your Android device after following these steps and complete the on-screen instructions to start your device. Afterward, you will bypass Google account successfully.
Conclusion
Do you want to bypass Google account within 5 minutes successfully? Dr.Fone is the best suitable choice for unlocking complicated passwords, including bypassing FRP. Follow the detailed guidelines to unlock FRP lock through this efficient tool so that you can use your phone freely again.
Laila Azzahra is a professional writer and blogger that loves to write about technology, business, entertainment, science, and health.
